Android Fragment是3.0之後的版本才推出,
其主要目的是為了讓tablet更能夠有效地利用螢幕空間,
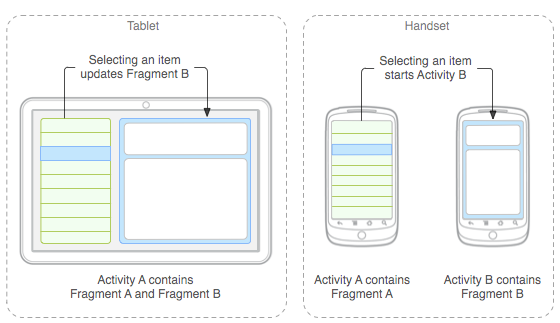
可以看到上面的圖片,
右邊是傳統的device,可以看到在List點擊以後,會去start Activity B,
然後跳離List頁面!
而左邊的tablet的行為就不一樣,而是點選List以後在右邊跳出Activity B!
運用Fragment還有個好處,
寫一次code就可以在tablet和handset裝置上有不同的user experience!
(有前提)
開始之前要先說明二件事情,
第一件事情,
Fragment一定要依附在Activity裡面!
簡言之,必須透過Activity去load Fragment進來!
第二件事情,
一開始我們就有說過Fragment只能使用在3.0以上的裝置,
以下是不行的,那麼該怎麼辦呢?
Google有推出compatibility的lib使用!
所以如果想要你的app也能夠在2.x的裝置上面跑,
又希望能夠在大尺寸螢幕上的裝置有好的user experience的話,就要把這lib include進來!
但是!!!當然不是單單include進來就好了!
寫法還是有點點點點點點稍微的不同!
這篇會說明不同的點在哪邊!
而把fragment load進來大概分兩種方法!
1. 靜態(預設load)
2. 動態地載入
先講第一種靜態!
首先你要先定義一個layout,這layout是fragment裡面的樣式,
這裡先取名為fragment.xml,如下:
<?xml version="1.0" encoding="utf-8"?>
<LinearLayout xmlns:android="http://schemas.android.com/apk/res/android"
    android:layout_width="match_parent"
    android:layout_height="match_parent"
    android:orientation="vertical" >

    <TextView
        android:id="@+id/textView1"
        android:layout_width="wrap_content"
        android:layout_height="wrap_content"
        android:text="Fragment" />

</LinearLayout>
接著你就要有一個Fragment,如下:
Fragment基本上有自己的lifecycle,而且還蠻多的(相較於activity)
雖然他有自己的lifecycle,不過我們剛剛說過Fragment必須被Activity load進來,
所以他的lifecycle會跟隨於Activity!
package net.kenyang.practicefragment;


import android.os.Bundle;
import android.support.v4.app.Fragment;// 如果要向下相容至2.x,請import這項,如果不向下,就import下面被註解的那項
//import android.app.Fragment;
import android.view.LayoutInflater;
import android.view.View;
import android.view.ViewGroup;

public class FragmentA extends Fragment {
 @Override
 public void onCreate(Bundle savedInstanceState) {
  super.onCreate(savedInstanceState);
 }
 @Override
 public View onCreateView(LayoutInflater inflater, ViewGroup container,
   Bundle savedInstanceState) {

  // 取得剛剛上步驟的layout(fragment.xml)
        return inflater.inflate(R.layout.fragment, container, false);
 }
}
完成上述兩個步驟以後,
你得先建立一個activity的layout!
如下:
<LinearLayout xmlns:android="http://schemas.android.com/apk/res/android"
    xmlns:tools="http://schemas.android.com/tools"
    android:layout_width="match_parent"
    android:orientation="horizontal"
    android:layout_height="match_parent"
    tools:context=".MainActivity" >

    <TextView
        android:id="@+id/textView1"
        android:layout_weight="1"
        android:layout_width="wrap_content"
        android:layout_height="wrap_content"
        android:text="@string/hello_world" />

    <fragment
        android:id="@+id/first"
        android:name="net.kenyang.practicefragment.FragmentA"
        android:layout_weight="2"
        android:layout_width="match_parent"
        android:layout_height="match_parent" />

</LinearLayout>
可以看到這xml當中有一個以往2.x沒有的element,就是fragment,
這個就是用來靜態地load fragment的!
而這element中還有一個attribute,就是 android:name,
這attribute是最重要的,請填入我們剛剛的Fragment name,記得要連接package name才行!
接著就是來寫Activity了!
如下:
package net.kenyang.practicefragment;

import android.os.Bundle;
import android.support.v4.app.FragmentActivity;

//public class MainActivity extends Activity { // above 3.0
public class MainActivity extends FragmentActivity { // below 3.0

 @Override
 protected void onCreate(Bundle savedInstanceState) {
  super.onCreate(savedInstanceState);
  setContentView(R.layout.activity_main);
 }

}
這Activity中其實跟以往的沒有太大差別!
唯一差別在於第7和第8行!
如註解所說,如果你要向下相容,請使用FragmentActivity才行!
完成上述的實作就完成靜態的loading!
現在要講動態的!
首先先把上述activity的layout改成下述的設定:
<LinearLayout xmlns:android="http://schemas.android.com/apk/res/android"
    xmlns:tools="http://schemas.android.com/tools"
    android:layout_width="match_parent"
    android:id="@+id/llParent"
    android:orientation="horizontal"
    android:layout_height="match_parent"
    tools:context=".MainActivity" >

    <Button
        android:id="@+id/btnAdd"
        android:layout_width="wrap_content"
        android:layout_height="wrap_content"
        android:text="Add" />
</LinearLayout>
這個xml只是多了一個button,
以及在LinearLayout中加入了id,
加入id的目的是為了等等要把FragmentA丟入某一個指定的view中,
所以得知道該view的id!
接著就在MainActivity中,設定動態載入吧!
package net.kenyang.practicefragment;

import android.os.Bundle;
import android.support.v4.app.Fragment;
import android.support.v4.app.FragmentActivity;
import android.support.v4.app.FragmentManager;
import android.support.v4.app.FragmentTransaction;
import android.view.View;
import android.view.View.OnClickListener;
import android.widget.Button;

//public class MainActivity extends Activity { // above 3.0
public class MainActivity extends FragmentActivity { // below 3.0

 private Button btnAdd = null;

 @Override
 protected void onCreate(Bundle savedInstanceState) {
  super.onCreate(savedInstanceState);
  setContentView(R.layout.activity_main);

  btnAdd = (Button) findViewById(R.id.btnAdd);
  btnAdd.setOnClickListener(new OnClickListener() {
   @Override
   public void onClick(View v) {
    FragmentManager fragmentManager = getSupportFragmentManager();  // 取得FragmentManager(如果不向下相容,就不用加Support)
    FragmentTransaction fragmentTransaction = fragmentManager.beginTransaction();
    FragmentA f = new FragmentA();  // 把上面的FragmentA new出來!
    fragmentTransaction.add(R.id.llParent, f);  // 丟入到llParent之中
    fragmentTransaction.commit(); // 必須commit以後才會真正add
   }
  });

 }

}
完成上述步驟就可以動態載入了!
但是!儘管你學會了這兩種方式,其實還是做不出第一張圖的效果!
看起來好像點了左邊的button,就可以在右邊add一個Fragment進來!
的確達到了在tablet上優化User Experience的效果!
但你會發現...如果你放在一般的device上面,還是像跟圖一中的左邊區塊一樣!!
並不是右邊的效果!那不是反而在一般device上的UX會比較差嗎?
這是因為你還得善用layout以及layout-large才能完成!
就..在下一篇講解吧!