這篇要講怎麼整合IAB,
IAB就是讓user可以在你的app中購買商品.
1. Download billing service library
開啓Android SDK Manager,
找到最下面的 Extras,安裝Google Play Billing Library,
安裝完以後,在您Android SDK 目錄中會有該 Library,位置如下:
$SDK_PATH/extras/google/play_billing/in-app-billing-v03
2. Create new package
接著在這一步要在你的project下建立一個新的package,
點選 File > New > Package, 名稱為com.android.vending.billing
3. Copy necessary files
在這一步驟要複製一些必要的檔案至project中,
1. IInAppBillingService.aidl,
這個檔案放在$SDK_PATH/extras/google/play_billing/in-app-billing-v03底下,
把IInAppBillingService.aidl,複製到我們剛剛create的package中,
2. *.java
Google幫我們寫好了很多的wrapper,可以很方便地使用IAB,
這wrapper會幫我們處理一些bind service的動作,
透過這些wrapper可以輕易地整合IAB,
檔案路徑如下:
$SDK_PATH/extras/google/play_billing/samples/TrivialDrive/src/com/example/android把這底下所有的.java複製到你的project當中,並且要把package名稱改成自己的
/trivialdrivesample/util
4. Add permission
接著要在AndroidManifest.xml中加入下面這個權限,
<uses-permission android:name="com.android.vending.BILLING">
</uses-permission>
5. Upload apk
因為要購買一個商品,這商品在新増之前,
你一定要有一個apk是有BILLING權限的,
否則是不能新增一個商品.
所以在這步驟要先上傳上去,你可以上傳以後再把它變成draft就好,
當然!你也可以通通寫完code再丟上去測試.
6. Add product
上傳apk以後,接著就可以去developer console新增product了,
1. 先到自己的developer console
2. 點選自己的app
3. 點選左邊的In-app Products
4. 點選Add new product
5. 輸入Product ID(這id等等code裡面會用到)
6. 最後填寫product的資訊
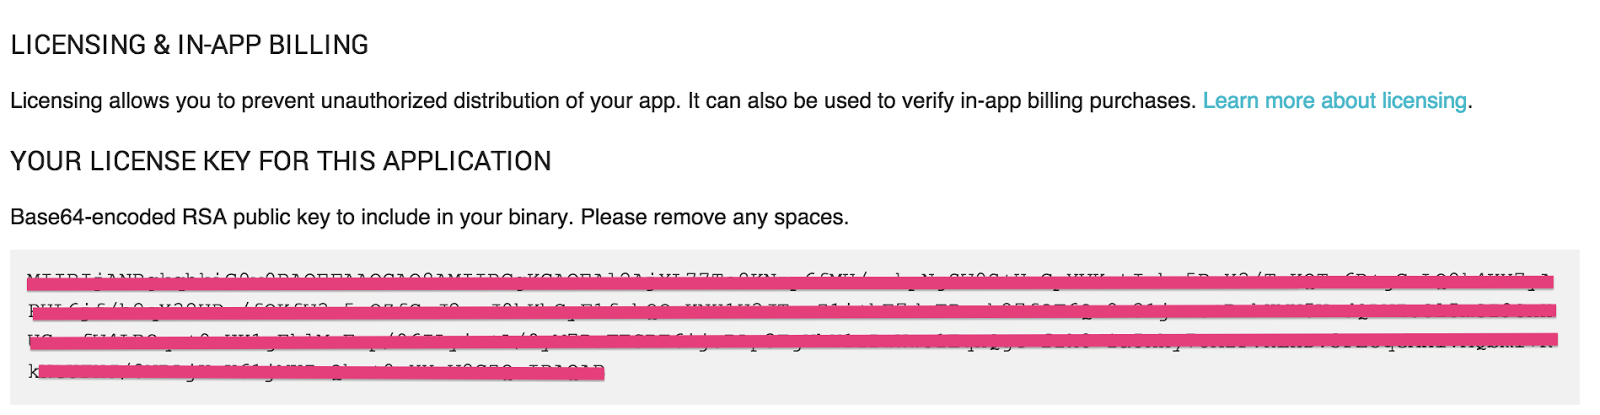
7. Get public key
由於在跟Google Play溝通時,
需要一把public key,
這把key一樣在developer console上,
1. 先到自己的developer console
2. 點選自己的app
3. 點選左邊的Services & APIs
key就會在畫面之中,如下圖!
8. Implement
8-1. Setup
首先要先setup IabHelper,
在setup時就要把剛剛哪組public_key帶進去,
但由於Google有強烈的建議,不要直接hard code public key,
至少要用個xor encrypt的方式,或者用拆解字串的方式存放public key,
xor encrypt就是你先用xor去encrypt你的public key,
之後把encrypt過後的public key放在你的project中,
要用的時候再拿出來decrypt,decrypt完以後,應該就會是原先的public key了,
接著再判斷一下那組public key是否有包含“某部份”真正public key,
有的話才真的是你的public key,
private IabHelper mHelper;8-2 購買商品
@Override
public void onCreate(Bundle savedInstanceState) {
String base64EncodedPublicKey = xorDecrypt(PUBLIC_KEY, "key_password");
if (!base64EncodedPublicKey
.contains("eFESRE6ijsRAp3TgWhY1zDwWwo1EqxQgt+f")) {
throw new RuntimeException("This is not my key");
}
mHelper = new IabHelper(this, base64EncodedPublicKey);
mHelper.startSetup(new IabHelper.OnIabSetupFinishedListener() {
public void onIabSetupFinished(IabResult result) {
Log.d(TAG, "Setup finished.");
if (!result.isSuccess()) {
Log.d(TAG, "Problem setting up In-app Billing: " + result);
}
if (mHelper == null)
return;
}
});
}
public static String xorDecrypt(String input, String key) {
byte[] inputBytes = Base64.decode(input, Base64.DEFAULT);
int inputSize = inputBytes.length;
byte[] keyBytes = key.getBytes();
int keySize = keyBytes.length - 1;
byte[] outBytes = new byte[inputSize];
for (int i = 0; i < inputSize; i++) {
outBytes[i] = (byte) (inputBytes[i] ^ keyBytes[i % keySize]);
}
return new String(outBytes);
}
購買商品要透過launchPurchaseFlow,
launchPurchaseFlow有五個參數,
1. activity
2. product id,就是剛剛上面在developer console新增的那組
3. request code,onActivityResult時會回傳回來
4. listener,購買狀態的listener,用來接收購買成功與否
5. string,可以是空的,可以想像成是補充說明的意思,一樣在購買之後會回傳回來
    if (mHelper != null) {
        mHelper.launchPurchaseFlow(this,
                SKU_PREMIUM,
                10001,
                mPurchaseFinishedListener,
                "bGoa+V7g/yqDXvKRqq+JTFn4uQZbPiQJo4pf9RzJ");
    }


    IabHelper.OnIabPurchaseFinishedListener mPurchaseFinishedListener = new IabHelper.OnIabPurchaseFinishedListener() {
        public void onIabPurchaseFinished(IabResult result, Purchase purchase) {
            if (result.isFailure()) {
                Log.e(TAG, "Error purchasing: " + result);
                return;
            } else if (purchase.getSku().equals(SKU_PREMIUM)) {
                Toast.makeText(getApplicationContext(), "buy success",Toast.LENGTH_LONG).show();
                Log.d(TAG, "Success purchasing:");
            }
        }
    };
8-3 查詢是否有購買
在購買成功以後,android會把購買的結果cache在機器上,
以便快速地查詢, 查詢要透過queryInventoryAsync,
queryInventoryAsync有二個參數,
1. 是否要query product detail(ex: price)
2. listener
其實第一個參數不一定要,
但是當你在沒有網路的情況下, 你的request一定都會是fail,
以至於你無法判斷這個user是否有購買了商品,
且如果你加了第一個參數,你就無法得到商品的detail資訊.
所以使用者要自己衡量一下何時該用.
mHelper.queryInventoryAsync(false,mGotInventoryListener);8-4 Error handling
QueryInventoryFinishedListener mGotInventoryListener = new QueryInventoryFinishedListener() {
public void onQueryInventoryFinished(IabResult result, Inventory inventory) {
if (result.isFailure()) {
// handle error here
} else {
// does the user have the premium upgrade?
boolean mIsPremium = inventory.hasPurchase(SKU_PREMIUM);
if (mIsPremium) {
Toast.makeText(getApplicationContext(), "buy",Toast.LENGTH_LONG).show();
}else {
Toast.makeText(getApplicationContext(), "no buy",Toast.LENGTH_LONG).show();
}
}
}
};
最後一步驟,如果你launchPurchaseFlow了第一次,然後取消!
隨即馬上launchPurchaseFlow第二次,絕對會crash,
原因是因為在onActivityResult中要做點處理,
我覺得這很tricky,因為在官網上並沒有提到!
是去看他的example code才發現的!
最後也要記得destroy這個helper.
    @Override
    protected void onActivityResult(int requestCode, int resultCode, Intent data) {
        Log.d(TAG, "onActivityResult handled by IABUtil.1");
        // Pass on the activity result to the helper for handling
        if (mHelper!=null && !mHelper.handleActivityResult(requestCode, resultCode, data)) {
            Log.d(TAG, "onActivityResult handled by IABUtil.2");
            // not handled, so handle it ourselves (here's where you'd
            // perform any handling of activity results not related to in-app
            // billing...
            super.onActivityResult(requestCode, resultCode, data);
        } else {
            Log.d(TAG, "onActivityResult handled by IABUtil.");
        }
    }

    @Override
    protected void onDestroy() {
        super.onDestroy();
        if (adView != null) {
            adView.destroy();
        }

        if (mHelper != null)
            mHelper.dispose();
        mHelper = null;
    }
9. Test
要測試IBA真的是件麻煩的事情,
要做兩件事,
1. create test account
因為你用自己的developer account測,會永遠無法購買, '
會跟你說publisher cannot purchase this item.
所以要去到developer console中的setting裡面加一組test account,
2. Export Signed Application
因為你無法用debug key去build app,
用debug key build出來的app是無法測試的...
所以得用production key sign出來的app才可以測試.
接著再把sign好的apk裝在手機上就可以測試了!