How to create X.509 certificates for Amazon IAM user?

27 August 2014

You will need X.509 certificates when you send a SOAP request to AWS or use command line tool.
There are two ways to create X.509 certificates.

(1) If you are not using IAM account:
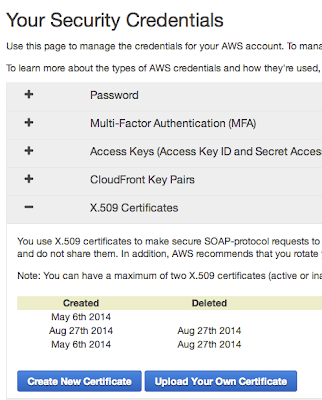
    You can create certificate on AWS console.
    Each account only have a maximum of two certificates at a time.


(2) If you are using IAM account:
    You need to create certificate by yourself.


1. Create private key

You need to create a private key first before create a certificate,
because you will use this private key to create a certificate.
openssl genrsa 2048 > private-key.pem


2. Create certificate

Once you finished the step one, you can use the private key to create a certificate.
openssl req -new -x509 -nodes -sha1 -days 99999 -key private-key.pem -outform PEM > cert.pem  


3. Copy the content of certificate

After you finished all the steps, just copy the content of the certificate.
ken@build:~$ cat cert.pem 
-----BEGIN CERTIFICATE-----
MIIDXzCCAkegAwIBAgIJAJxcjyc5F908MA0GCSqGSIb3DQEBBQUAMEUxCzAJBgNV
BAYTAkFVMRMwEQYDVQQIDApTb21lLVN0YXRlMSEwHwYDVQQKDBhJbnRlcm5ldCBX
aWRnaXRzIFB0eSBMdGQwIBcNMTQwODI3MDc1NDAyWhgPMjI4ODA2MTAwNzU0MDJa
MEUxCzAJBgNVBAYTAkFVMRMwEQYDVQQIDApTb21lLVN0YXRlMSEwHwYDVQQKDBhJ
bnRlcm5ldCBXaWRnaXRzIFB0eSBMdGQwggEiMA0GCSqGSIb3DQEBAQUAA4IBDwAw
ggEKAoIBAQCk8L/z2O84OcRno7YgGu0UkjnABuXhIM96RfZZKhqg74hga7nsLPLK
CzhtslDKAOEjxASo7L0Iq6/5kxJZp4cZakKacDOvnnv2HwQxCXGUEadXcmeknfAh
SvyRYS3FrKj4/oth+pwUm6nvd9fGYg01rJITUQupeADCqhSJUypZbQUypmPxf8Sg
ek7ZW5ErPuyZZ+WmL6TzZaQXfZqvPrN25hRg7AboB8SIKgusUrLK6WgnISlJ7fDh
kCpsy8qSD+Lu74h2hW6TiLy2qJbcTKn8sKb1C4XgWb1FBMzqfJQWtCMVWtDoyzZH
Vj07gzeTDkQ1EvUKHk26x6MEsOlcTV9XAgMBAAGjUDBOMB0GA1UdDgQWBBQOYnDF
FYz2o3+AlVHWwPIzlcFs4DAfBgNVHSMEGDAWgBQOYnDFFYz2o3+AlVHWwPIzlcFs
4DAMBgNVHRMEBTADAQH/MA0GCSqGSIb3DQEBBQUAA4IBAQBPE3ikbJ/vH6QfkwUK
qot+nU15keDSZ2c6itRnNuwjfF8lsZQCJ66w2H+HXCLBjnPymemcTPTMUqfovpFs
oNohRuQS6IoIrvgXAbb2X4BhygPDNSQPktGVo8qjKUyxYZa4Su8NFkb+OzZWDR4K
KN+OLFfaT6cx8o9o5M7cmNRokFisWynJ33EoKj1lW5YIwTwb1VKz4hXW+gKZFX7u
pgE1yzkOcoUW5EykNsGUaqLSdycxmDO866IFn6px9etxpIkQwUi+rb78tX6pNtpa
IBTsfPBqovXRdMe6mq5uO8x4Nrb47w8DZkrQSTMt1ll4t0bUL15o/6cQ5ajGaaGA
QVtO
-----END CERTIFICATE-----


4. Upload the content of certificate

Go to the IAM management console.
1. Select an IAM user
2. Click "User Actions"
3, Click "Manage Signing Certificates"
4. Click "Upload Signing Certificates"
5. Paste the content
6. Click "Upload Signing Certificates"

Done. Now you can send a SOAP request to AWS or use the command line tools.


read more »


Setting up load balancing with Keepalived

07 July 2014

前一篇有講過了,
Keepalived是一個routing software,
它可以做到load balancing和high-availability,
前一篇也教怎麼set up HA,
這篇會講怎麼set up load balancing,
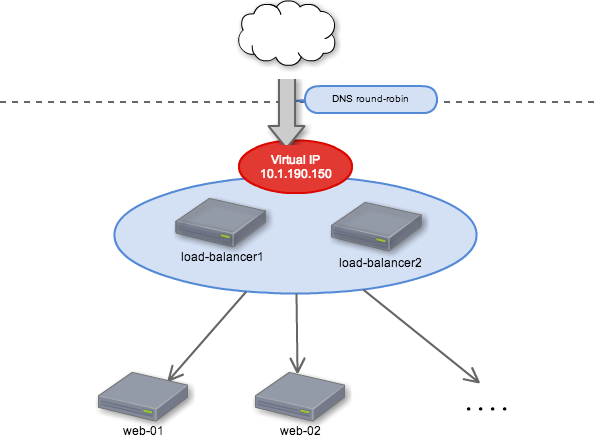
理論上架構應該要和下圖中一樣,才會比較合理,
有N檯load-balancer,專門做load balancing,
有N檯web!
而這些load balancer,都會裝keepalived,然後去binding Virtual IP!


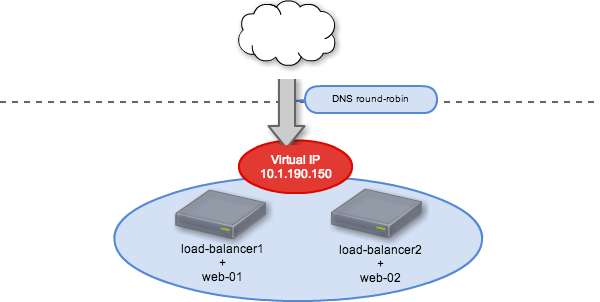
但基於測試方便加上懶得安裝這麼多檯機器來說明,
先簡化成下圖,
每一檯server身兼load balancer和web server,


前一篇一樣,假設我們有兩檯server,
IP分別為
  1. 10.1.190.142
  2. 10.1.190.143

virtual ip:10.1.190.150

在開始之前,請先去完成前一篇的所有操作,

1. Generate hash

首先,先gen hash,
這hash是給load balancer用的,
原因是load balancer會去確認每一檯的web server是活著的,
確認時會帶著這個hash值!
因為有兩檯機器,所以要gen 2組,
root@host1:~$ genhash -s 10.1.190.142 -p 80 -u /index.html
MD5SUM = 043e8a8eeaf59e7ef9c6b4cd6f71a7de

root@host1:~$ genhash -s 10.1.190.143 -p 80 -u /index.html
MD5SUM = 66d84fe2b7e20944dd5d077e768b2cfb


2. Write a script for handling iptables

在這步驟,要寫一隻script,
負責add和delete rule的,
為什麼要add?
因為當如果沒有add virtual ip進去rule,
當load balancer把packet轉進來時,是送不進來的!
#!/bin/bash                                                                                                                                                                 

VIP=$2

count=$(iptables -t nat -L| grep $VIP | wc -l)

case "$1" in
--add)
if [[ $count == 0 ]]; then
iptables -A PREROUTING -t nat -d $VIP -p tcp -j REDIRECT
fi
;;
--del)
if [[ $count > 0 ]]; then
iptables -D PREROUTING -t nat -d $VIP -p tcp -j REDIRECT
fi
;;
esac

exit 0

3. Configuration settings

基本上設置跟第一篇沒有什麼太大差別,
首先只有第26,27行,多了兩個指令,
分別是當這檯機器進入master模式時,要把rule刪除
以及進入backup時,要把rule加進去!

以及增加了31~60行的setting,
記得第一檯和第二檯都要進行設定,但一樣要把state,priority, router_id改成符合該host的設定!
global_defs {
notification_email {
kenyang@xxx.com
}
notification_email_from xxxx@example.com
smtp_server 127.0.0.1
smtp_connect_timeout 30
router_id host1 # 用來識別是哪檯機器,如果postfix有安裝,在寄信的時候,title就會跟你說是哪檯機器有問題
}

vrrp_instance VI_1 { # VI_1 可以改成自己想要的string

state MASTER # MASTER意思是這檯為主要的機器

interface eth0 # 把virtual ip binding在eht0上

virtual_router_id 1 # 0~255之間,用來識別是哪一個instance
priority 100

virtual_ipaddress {
10.1.190.150/24
}

smtp_alert # 當有問題時要發信通知

notify_master "/etc/keepalived/handle_iptable.sh --del 10.1.190.150" # 當這檯機器進入master模式時,要把rule刪除
notify_backup "/etc/keepalived/handle_iptable.sh --add 10.1.190.150" # 當這檯機器進入backup模式時,要把rule加入
}

# virtual web server
virtual_server 10.1.190.150 80 {
delay_loop 10 # n秒確認底下的web一次
lb_algo rr # 使用Round Robin的演算法做load balancing (rr, wrr, al, wlc, ......etc)
lb_kind DR # Forwarding的方法 (dr, nat, tun)
persistence_timeout 5 # timeout for persistent connection
protocol TCP

real_server 10.1.190.142 80 {
HTTP_GET { # 使用HTTP_GET的方式進行確認web活著
url {
path /index.html
digest 043e8a8eeaf59e7ef9c6b4cd6f71a7de # 剛剛第一步驟gen的hash
}
connect_timeout 3
nb_get_retry 3
delay_before_retry 2
}
}
real_server 10.1.190.143 80 {
HTTP_GET { # 使用HTTP_GET的方式進行確認web活著
url {
path /index.html
digest 66d84fe2b7e20944dd5d077e768b2cfb # 剛剛第一步驟gen的hash
}
connect_timeout 3
nb_get_retry 3
delay_before_retry 2
}
}
}


4. Verify

完成上述設定以後,
先把keepalived reload,
service keepalived reload

reload完成以後,
先在第一檯打下面的指令,
為什麼是在第一檯打?因為現在第一檯是master,它搶到virtual ip,
所以load balancing的工作是交由第一檯來做的!
ipvsadm -ln

打完應該會看到下面的內容,
10.1.190.150這檯底下有兩檯主機,
分別是142, 143,
load balancer就是透過上述的HTTP_GET去確認web server是活著的,
比較特別的有兩個參數,
  1. ActiveConn: 簡言之這檯機器目前有幾個人連上來
  2. InActConn: 有幾檯機器的tcp status不是established
Prot LocalAddress:Port Scheduler Flags
-> RemoteAddress:Port Forward Weight ActiveConn InActConn
TCP 10.1.190.150:80 rr persistent 5
-> 10.1.190.142:80 Route 1 0 0
-> 10.1.190.143:80 Route 1 0 0

這時候在電腦上的browser瀏覽10.1.190.150,
然後在手機(或者其他檯電腦上)也瀏覽10.1.190.150
然後再馬上在第一檯機器打下面的指令
ipvsadm -ln
應該會發現ActiveConn都變成1了!
如果你有第三檯機器,你可以試試看再連線10.1.190.150!
這時某一檯的ActiveConn會變成2!


read more »


Setting up a High-Availability(HA) environment with Keepalived

06 July 2014

Keepalived是一個routing software,
它可以做到load balancing和high-availability,
load balancing會倚靠lvs (linux virtual server, ipvsadm)來做到(但這篇只會做HA,下篇再講怎麼做load balancing),
而high-availability是靠VRRP protocol來達成,
那什麼是VRRP(Virtual Router Redundancy Protocol )?
簡單的說,就是為了當某個router故障,然後可以快速的failover,
Keepalivied就是利用這protocol來達到HA.

假設我們有兩檯web server,
IP分別為
  1. 10.1.190.142
  2. 10.1.190.143

在兩檯都安裝好keepalived的情況下,
被設定為"MASTER"的那檯機器,會去binding 一個我們所指定的virtual ip!
這裡先假設virtual ip為10.1.190.150

1. Install the packages

首先先ssh到第一檯和第二檯上,安裝等等會用到的幾個packages,
  1. keepalived
  2. nginx: 你也可以選擇你想要用的web server
  3. postfix: optional, 安裝postfix的目的在於,server壞掉時,會寄信通知你
apt-get install keepalived nginx postfix


2. Set up environment

安裝好以後,先確認你的nginx是有起來的,
開browser去打一下web server就可以簡單確認!

接著先到第一檯機器上去進行keepalived的config設定
vim /etc/keepalived/keepalived.conf

內容如下:
global_defs {
notification_email {
kenyang@xxx.com
}
notification_email_from xxxx@example.com
smtp_server 127.0.0.1
smtp_connect_timeout 30
router_id host1 # 用來識別是哪檯機器,如果postfix有安裝,在寄信的時候,title就會跟你說是哪檯機器有問題
}

vrrp_instance VI_1 { # VI_1 可以改成自己想要的string

state MASTER # MASTER意思是這檯為主要的機器

interface eth0 # 把virtual ip binding在eht0上

virtual_router_id 1 # 0~255之間,用來識別是哪一個instance
priority 100

virtual_ipaddress {
10.1.190.150/24
}

smtp_alert # 當有問題時要發信通知
}


接著就到第二檯上去進行設定,
其實內容大致上和第一檯一模一樣,
只有router_id, state, priority需要變動
內容如下,
global_defs {
... same with host1 ...
router_id host2
}

vrrp_instance VI_1 { # VI_1 可以改成自己想要的string
... same with host 1 ....
state BACKUP
priority 50
}

完成設定以後,分別在兩檯機器上打開keepalived,
service keepalived start


3. Verify

最後就來驗證ha是work的,
先到第一檯上去,因為第一檯設定為MASTER,
因此理論上第一檯除了自己的IP (10.1.190.142)以外,
還要拿到這個virtual ip (10.1.190.150),
打下面的指令可以驗證,
root@host1:~$ ip a | grep eth0 | grep inet
inet 10.1.190.142/24 brd 10.1.190.255 scope global eth0
inet 10.1.190.150/24 scope global secondary eth0

接著打開web browser去連virtual ip (10.1.190.150),
都會導到第一檯的nginx去!
這時候把第一檯關機!
root@host1:~$ shutdown now

此時第二檯應該要拿到virtual ip,
一樣打下面的指令做驗證
root@host2:~$ ip a | grep eth0 | grep inet
inet 10.1.190.143/24 brd 10.1.190.255 scope global eth0
inet 10.1.190.150/24 scope global secondary eth0

然後再打開web browser去連virtual ip (10.1.190.150),
此時看到的內容會是第二檯nginx上的內容!


除此之外,如果postfix有設定成功,
應該是會收到mail跟你說host2進入了MASTER模式,
標題是:[host2] VRRP Instance VI_1 - Entering MASTER state
內容是:=> VRRP Instance is now owning VRRP VIPs <= 下一篇再教怎麼用keepalived做load balance.

read more »